How To Graft Fruit Trees: Whip, Cleft And Bud Grafting For Beginners
On this page
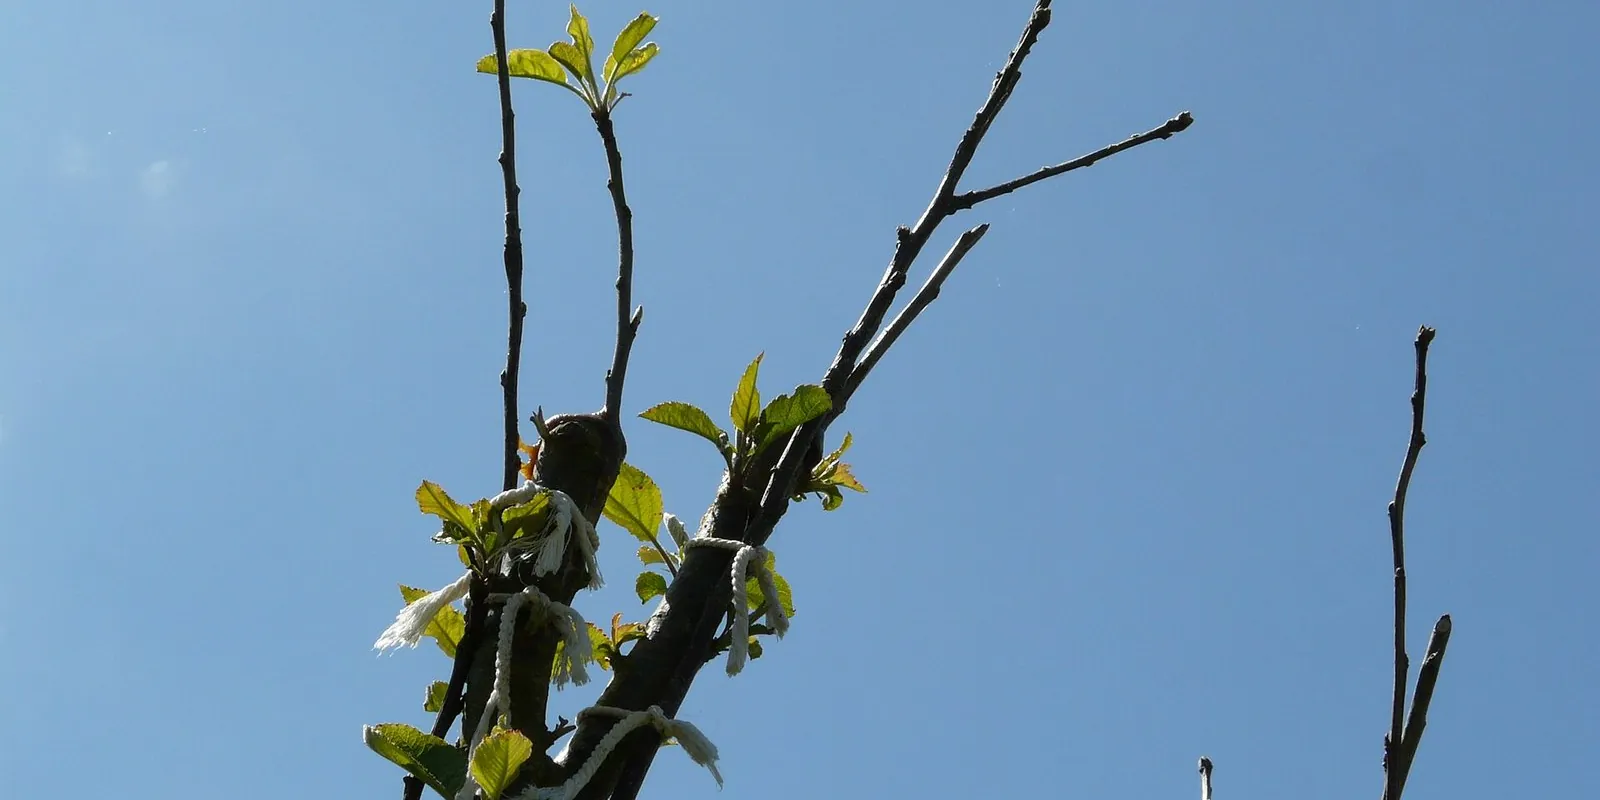
Grafting lets you join a branch from one fruit tree onto the roots of another. It is how nurseries make every named apple, pear, cherry, and plum tree, and it is a skill any home gardener can learn with a sharp knife and a little practice. With it you can save an old family variety, add new varieties to an existing tree, or turn one tree into a multi variety tree that pollinates itself.
This guide explains how grafting works, then walks through the three methods beginners use most: whip and tongue grafting, cleft grafting, and bud grafting. You will learn when to do each one, what tools you need, and how to care for new grafts until they take. The methods follow standard university extension guidance used by orchardists across the United States.
How Grafting Works
A graft joins two living pieces of plant so they grow together as one.
Scion And Rootstock
The scion is the short piece of stem, with buds, from the variety you want to grow. The rootstock is the root system and lower trunk that the scion is joined to. The rootstock controls tree size, vigor, and some disease resistance. The scion decides the fruit.
The Cambium Is The Key
Just under the bark lies a thin green layer called the cambium. It is the only part of the stem that produces new cells. For a graft to take, the cambium of the scion must touch the cambium of the rootstock along as much of the cut as possible. The two layers then form callus tissue that knits together into a working connection within a few weeks.
Which Trees Can Be Grafted Together
Grafts only work between closely related plants. Apple grafts onto apple and crabapple. Pear grafts onto pear and, with some varieties, quince. Stone fruits such as plum, peach, apricot, and cherry belong to the genus Prunus, and some combinations work while others fail over time. As a rule, graft within the same species for the best results. You cannot graft an apple onto a citrus or a peach onto an apple.
Tools And Materials
You need only a few tools, but they must be sharp and clean.
The Essentials
- A grafting knife with a single bevel, honed razor sharp.
- Bypass pruners for cutting scions and rootstock.
- Grafting tape, parafilm, or rubber budding strips to hold the graft tight.
- Grafting wax or sealant to keep cut surfaces from drying.
- Rubbing alcohol to clean blades between trees.
- Labels and a waterproof marker.
Extra Tools For Cleft Grafts
Cleft grafting on thicker branches also needs a cleft grafting tool or a sturdy knife, a small mallet, and a screwdriver or wedge to hold the split open while you insert the scions.
Practice Before You Graft
Practice cuts on prunings from any tree before working on your real rootstock. Clean, flat cuts made in one smooth stroke make the difference between a graft that takes and one that fails. Always cut away from your body.
Collecting And Storing Scion Wood
Good scion wood is the foundation of a good graft.
When And What To Cut
Collect scion wood in mid to late winter, while the tree is fully dormant and before buds swell. Choose healthy shoots that grew last season, about the thickness of a pencil, with plump leaf buds. Avoid water sprouts and the fat, round flower buds at the tips of short spurs. Cut pieces 12 to 18 inches long.
How To Store Scions
Label each bundle with the variety. Wrap it in barely damp paper towel, seal it in a plastic bag, and store it in the refrigerator at about 32 to 40°F. Keep it away from ripening fruit, since the ethylene gas they release can damage buds. Stored this way, scions keep for several weeks until grafting season.
Whip And Tongue Grafting
The whip and tongue graft is the classic method for joining a scion to a young rootstock of the same size. It is strong, heals fast, and is the best place for beginners to start.
When To Do It
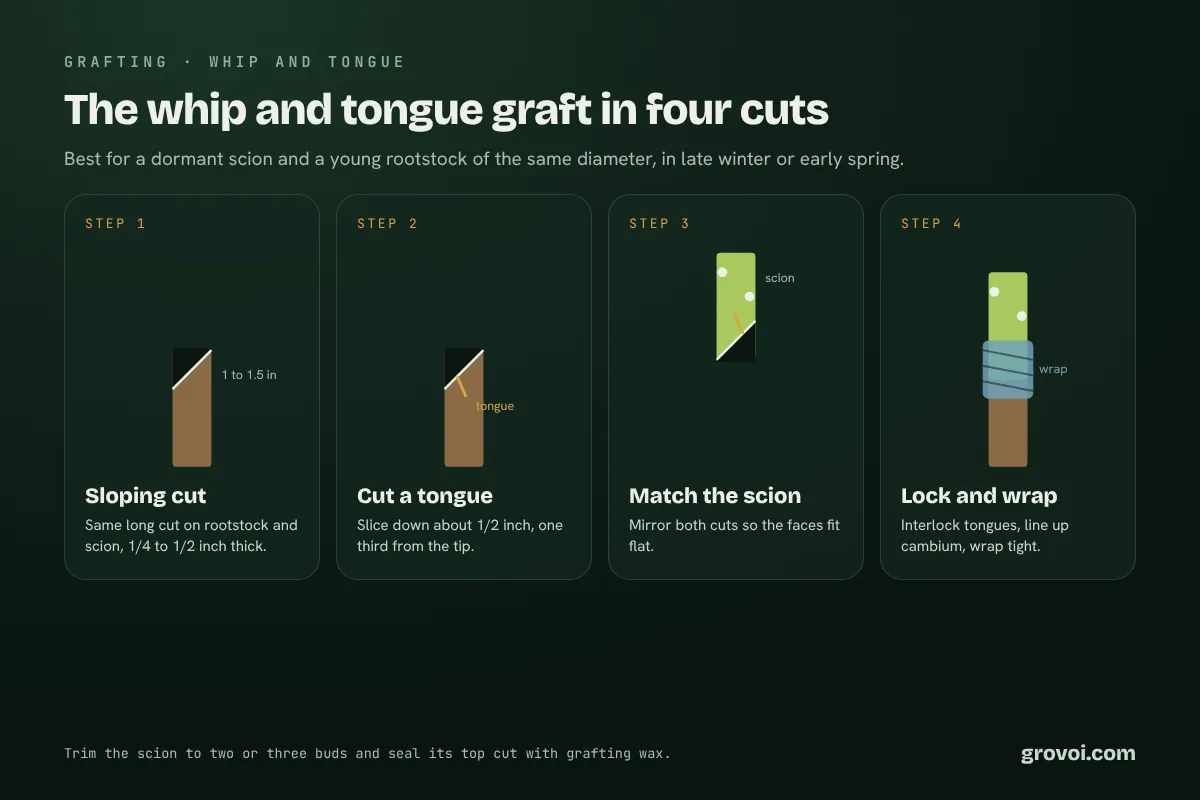
Graft in late winter or early spring, when the rootstock buds are just starting to swell but the scion is still dormant. The scion and rootstock should be the same diameter, ideally between 1/4 and 1/2 inch.
Step By Step
- Cut the rootstock straight across at a smooth spot, usually 6 to 10 inches above the soil.
- Make a long, smooth sloping cut across the top of the rootstock, about 1 to 1.5 inches long.
- Make the same sloping cut at the base of the scion, so the two faces match.
- On each piece, cut a tongue: start about one third of the way down from the tip of the sloping face and slice down into the wood, roughly parallel to the grain, for about 1/2 inch.
- Slide the scion and rootstock together so the tongues interlock and the cambium lines up on at least one side.
- Wrap the union tightly with grafting tape or parafilm from below to above the cut.
- Trim the scion to two or three buds and seal its top cut with wax.
If Sizes Do Not Match
When the scion is thinner than the rootstock, set it to one side so the cambium lines up along that edge. Matching one side well is far better than centering the scion and matching neither.
Cleft Grafting
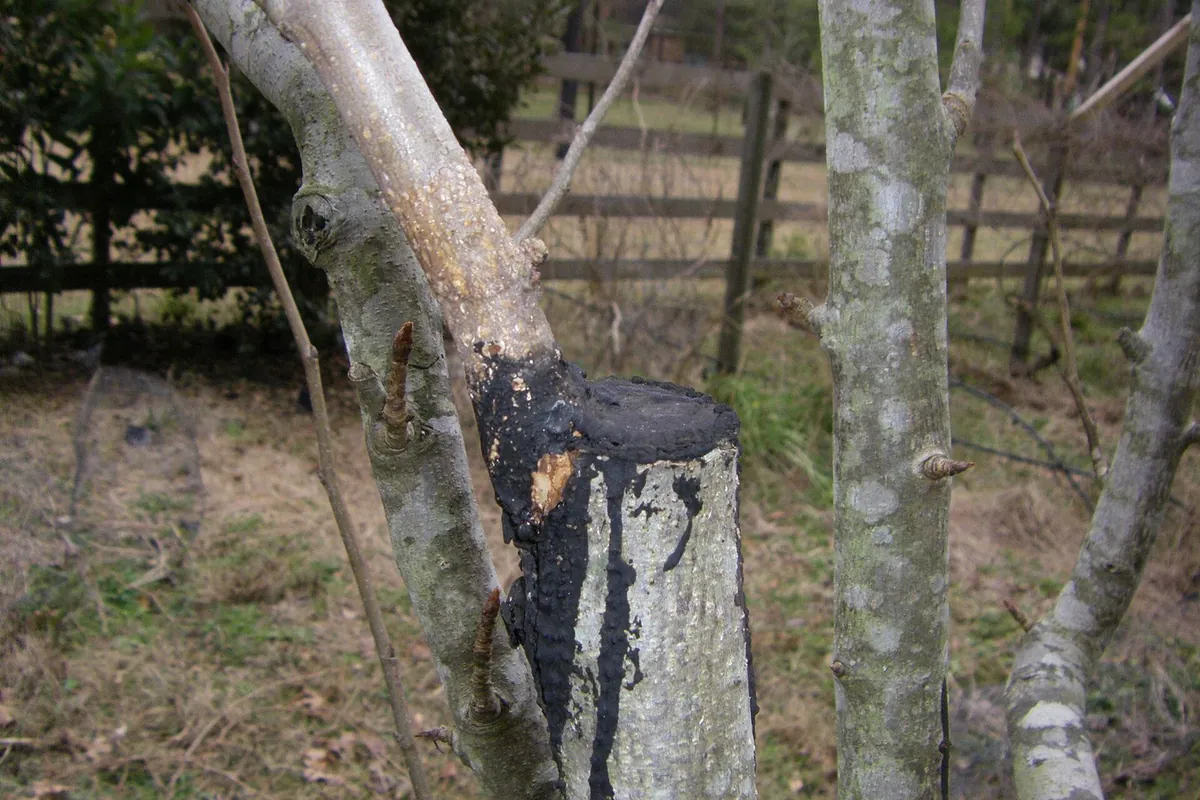
Cleft grafting is used to change the variety on an established tree. It works on branches or trunks too thick for a whip graft, a practice called topworking.
When To Do It
Cleft graft in early spring, as the tree’s buds begin to break. The rootstock branch should be about 1 to 4 inches in diameter. Scions should be dormant wood from storage.
Step By Step
- Cut the stock branch straight across with a fine saw, at a point with straight grain and no knots.
- Split the stub down the middle with a cleft tool and mallet to a depth of about 2 to 3 inches.
- Hold the split open with a wedge or screwdriver.
- Cut the base of each scion into a long wedge about 1 to 1.5 inches long, slightly thicker on the outer edge.
- Insert one scion at each side of the split, with the thicker edge outward. Tilt the tops slightly outward so the cambium layers cross.
- Remove the wedge. The split will clamp the scions tightly.
- Seal all cut surfaces, including the top of the stub, the split, and the scion tips, with grafting wax.
Choosing The Winner
Using two scions doubles your chance of success. If both take, keep the stronger one. Shorten the weaker one during the first summer, then remove it completely the following year.
Bud Grafting
Bud grafting, or budding, uses a single bud instead of a whole scion. It uses wood efficiently and is how most nursery fruit trees are made.
T Budding
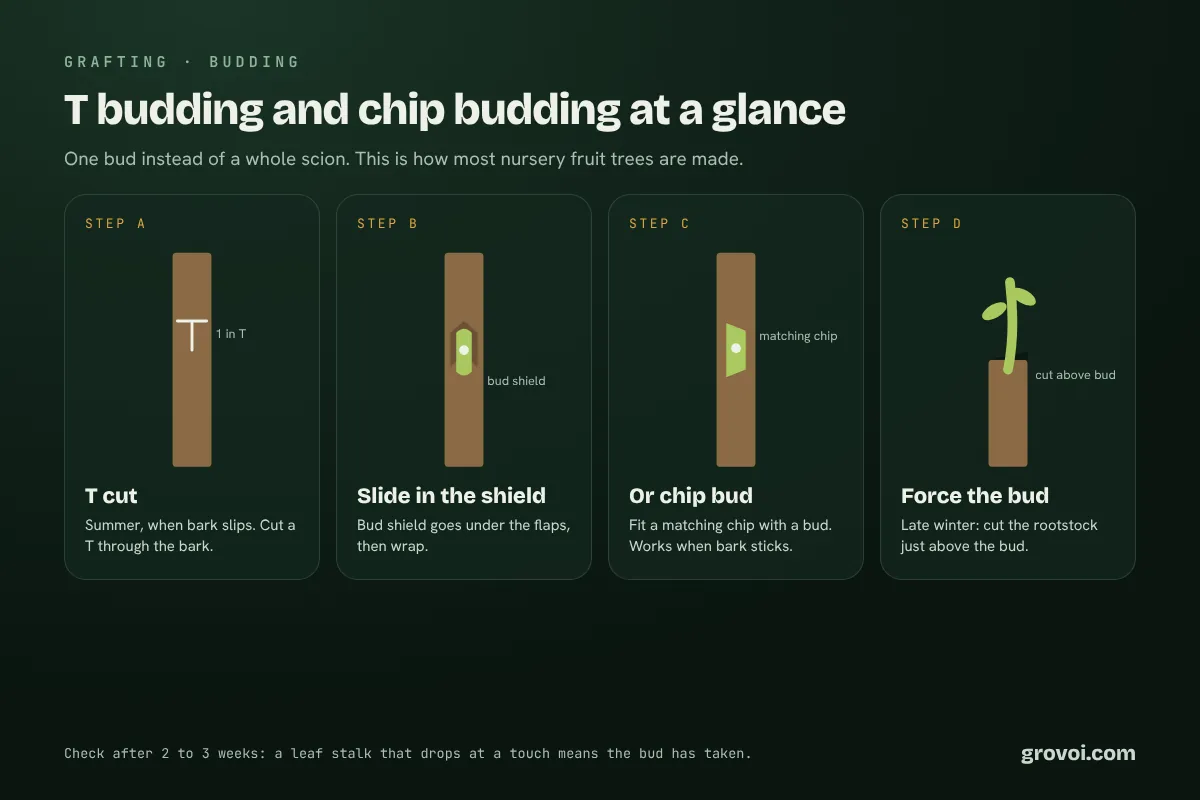
T budding is done in mid to late summer, when the bark “slips,” meaning it peels away easily from the wood. Cut a bud shield from a shoot of the current season, with a thin sliver of wood behind the bud. On the rootstock, make a T shaped cut through the bark, about 1 inch long. Lift the bark flaps, slide the shield down into the T, and wrap it firmly above and below the bud with a budding strip, leaving the bud itself exposed.
Chip Budding
Chip budding works even when the bark is not slipping, so it can be done in late summer or early spring. Remove a small chip of wood and bark from the rootstock, then cut a matching chip holding a bud from the scion wood and fit it into the gap. Wrap the whole chip tightly, often leaving the bud tip exposed.
Checking And Forcing The Bud
About two to three weeks after summer budding, check the leaf stalk left beside the bud. If it drops off at a light touch and the bud looks plump and green, the bud has taken. If the stalk shrivels and stays stuck, the bud has failed. Leave a successful bud dormant over winter. In late winter, cut the rootstock off just above the bud so it grows into the new tree.
Aftercare For New Grafts
Most grafts that fail do so in the weeks after grafting, not on the day.
Remove Rootstock Shoots
Rub off any shoots that sprout from the rootstock below the graft. They compete for water and food and can quickly crowd out the scion.
Loosen Wraps In Time
Check the union every few weeks. Rubber budding strips and parafilm usually break down on their own. Plastic tape does not, so cut it once the union has callused, before it starts to cut into the growing bark.
Support New Growth
A new graft can grow several feet in its first summer, and the union is weak at first. Tie the shoot loosely to a stake to stop wind from snapping it. Keep the tree well watered through summer.
Plant With The Union Above Ground
Whenever you plant a grafted tree, keep the graft union several inches above the soil. Buried unions can root, and the scion’s roots then override the dwarfing effect of the rootstock. Our guide on how to prune fruit trees covers training young grafted trees in later years.
What To Graft First
Some fruit trees are much easier to graft than others.
Best Trees For Beginners
Apples and pears are the easiest. They callus readily and accept all three methods. Start with a whip and tongue graft on a bought rootstock, or cleft graft a new variety onto an existing apple tree or pear tree.
Harder Trees
Stone fruits such as cherries, peaches, and plums are trickier and usually do better with bud grafting in summer. Citrus is also commonly budded. Our citrus tree care guide covers how grafted citrus differs from seedlings.
Multi Variety Trees
Grafting several varieties onto one tree saves space and solves pollination problems. Choose varieties that bloom at the same time and have similar vigor, so one does not take over. The University of Missouri Extension grafting guide covers more methods and illustrations.
Frequently Asked Questions
What is the best time of year to graft fruit trees?
Late winter to early spring is best for whip and tongue and cleft grafts, using dormant scion wood as rootstock buds begin to swell. Mid to late summer is best for T budding, when the bark slips. Chip budding can be done in either late summer or early spring.
What is the easiest graft for beginners?
The whip and tongue graft on apple rootstock is the most forgiving method for beginners. It holds itself together, has a large cambium contact area, and heals quickly. Cleft grafting is a close second when you want to add a variety to an existing tree.
How long does it take for a graft to take?
Callus usually forms within two to four weeks in warm weather. New leaves from a scion often appear three to six weeks after grafting. For bud grafts, check the leaf stalk after two to three weeks: if it falls off easily, the bud has taken.
Can you graft different fruits onto one tree?
Only closely related ones. You can graft many apple varieties onto one apple tree, or several pear varieties onto one pear tree. Some stone fruits such as plums, apricots, and peaches can share a tree, but compatibility varies. Apples and peaches cannot be grafted together.
Why did my graft fail?
Common causes are cambium layers that did not line up, a loose wrap, dried out scions, scions that had already broken bud, or grafting at the wrong time. Dull knives that crush the wood also reduce success.
Do I need grafting wax?
Wax or sealant keeps cut surfaces from drying out, which is essential for cleft grafts and for the top of whip graft scions. Parafilm wrapped over the whole scion does the same job and is easy for beginners to use.
Final Thoughts
Grafting looks technical, but it rests on one simple idea: line up the living cambium and hold it together until it heals. Start with apples or pears, practice your cuts, and expect a few failures along the way.
Your Fruit Tree Grafting Checklist
Collect pencil thick, dormant scion wood in winter and keep it cold and damp. Whip and tongue graft equal sized wood in late winter to early spring. Cleft graft thicker branches as buds break. Bud graft in summer when the bark slips. Wrap tightly, seal cut surfaces, remove rootstock shoots, and stake new growth. For more fruit growing guides, browse our fruit trees section.